Most of the users use Ubuntu 18.04 and later, so added the `libtesseract-dev` rather than `tesseract-ocr-dev` in the bash command so new people don't run into any errors as the NOTE was written after the command.
7.0 KiB
Compiling CCExtractor
You may compile CCExtractor across all major platforms using CMakeLists.txt stored under ccextractor/src/ directory. Autoconf and custom build scripts are also available. See platform specific instructions in the below sections.
Downloads for precompiled binaries and source code can be found on our website.
Clone the latest repository from Github
git clone https://github.com/CCExtractor/ccextractor.git
Linux
- Make sure all the dependencies are met.
Debian:
sudo apt-get install -y libglew-dev libglfw3-dev cmake gcc libcurl4-gnutls-dev tesseract-ocr libtesseract-dev libleptonica-dev clang libclang-dev
RHEL:
yum install -y glew-devel glfw-devel cmake gcc libcurl-devel tesseract-devel leptonica-devel clang
Rust 1.54 or above is also required.Install Rust. Check specific compilation methods below, on how to compile without rust
Note: On Ubuntu Version 18.04 (Bionic) and later, libtesseract-dev is installed rather than tesseract-ocr-dev, which does not exist anymore.
Note: On Ubuntu Version 14.04 (Trusty) and earlier, you should build leptonica and tesseract from source
- Compiling
Using the build script
By default build script does not include debugging information hence, you cannot debug the executable produced (i.e. ./ccextractor) on a debugger. To include debugging information, use the builddebug script.
#Navigate to linux directory and call the build script

cd ccextractor/linux

# compile without debug flags
./build

# compile without rust
./build -without-rust

# compile with debug info
./builddebug

# test your build
./ccextractor
Standard linux compilation through Autoconf scripts
sudo apt-get install autoconf      #Dependency to generate configuration script
cd ccextractor/linux
./autogen.sh
./configure # OR ./configure --without-rust
make

# test your build
./ccextractor

# make build systemwide
sudo make install
Using CMake
#Create and navigate to directory where you want to store built files
cd ccextractor/
mkdir build
cd build

#Generate makefile using cmake and then compile
cmake ../src/  # options here
make

# test your build
./ccextractor

# make build systemwide
sudo make install
cmake also accepts the options:
-DWITH_OCR=ON to enable OCR
-DWITHOUT_RUST=ON to disable rust.
-DWITH_HARDSUBX=ON to enable burned-in subtitles
Compiling with GUI:
To build CCExtractor with a GUI, you will additionally need to install GLEW and GLFW
In order to compile it, you'll need to configure it using autoconf by passing the -with-gui option.
./autogen.sh
./configure --with-gui
make

# make build systemwide
sudo make install
Once set up you can run the GUI interface from the terminal ./ccextractorGUI
macOS
- Make sure all the dependencies are met. Decide if you want OCR; if so, you'll need to install tesseract and leptonica. Dependencies can be installed via Homebrew as:
brew install pkg-config
brew install autoconf automake libtool
# optional if you want OCR:
brew install tesseract
brew install leptonica
If configuring OCR, use pkg-config to verify tesseract and leptonica dependencies, e.g.
pkg-config --exists --print-errors tesseract
pkg-config --exists --print-errors lept
Compiling
Using build.command script:
cd ccextractor/mac
./build.command  #   OR ./build.command OCR

# test your build
./ccextractor
Using CMake
#Create and navigate to directory where you want to store built files
cd ccextractor/
mkdir build
cd build

#Generate makefile using cmake and then compile
cmake ../src/  # options here
make

# test your build
./ccextractor
cmake also accepts the options:
-DWITH_OCR=ON to enable OCR
-DWITHOUT_RUST=ON to disable rust.
-DWITH_HARDSUBX=ON to enable burned-in subtitles
Standard compilation through Autoconf scripts:
cd ccextractor/mac
./autogen.sh
./configure   # OR ./configure --without-rust
make

# test your build
./ccextractor
Compiling with GUI:
To use CCExtractor with a gui you will additionally need to install GLEW and GLFW. You can do that by installing it via homebrew using:
brew install glfw
brew install glew
In order to compile it, you'll need to configure it using autoconf by passing the -with-gui option.
./autogen.sh
./configure --with-gui #OR .configure --with-gui --without-rust
make
Once set up, you can run the GUI interface from the terminal ./ccextractorGUI
Windows
Dependencies are clang and rust. To enable OCR, rust i686-pc-windows-msvc target should be installed
Note: Following screenshots and steps are based on Visual Studio 2017, but they should be more or less same for other versions.
1.Open windows/ directory to locate ccextractor.vcxproj, ccextractorGUI.vcxproj (blue arrows) and ccextractor.sln (red arrow).
2.Accept the security prompt (if any), to proceed with compilation.

3.Using Visual Studio (2015 or above), open ccextractor.sln. This will build both CCExtractor and its GUI. To build them separately, open the respective .vcxproj file.
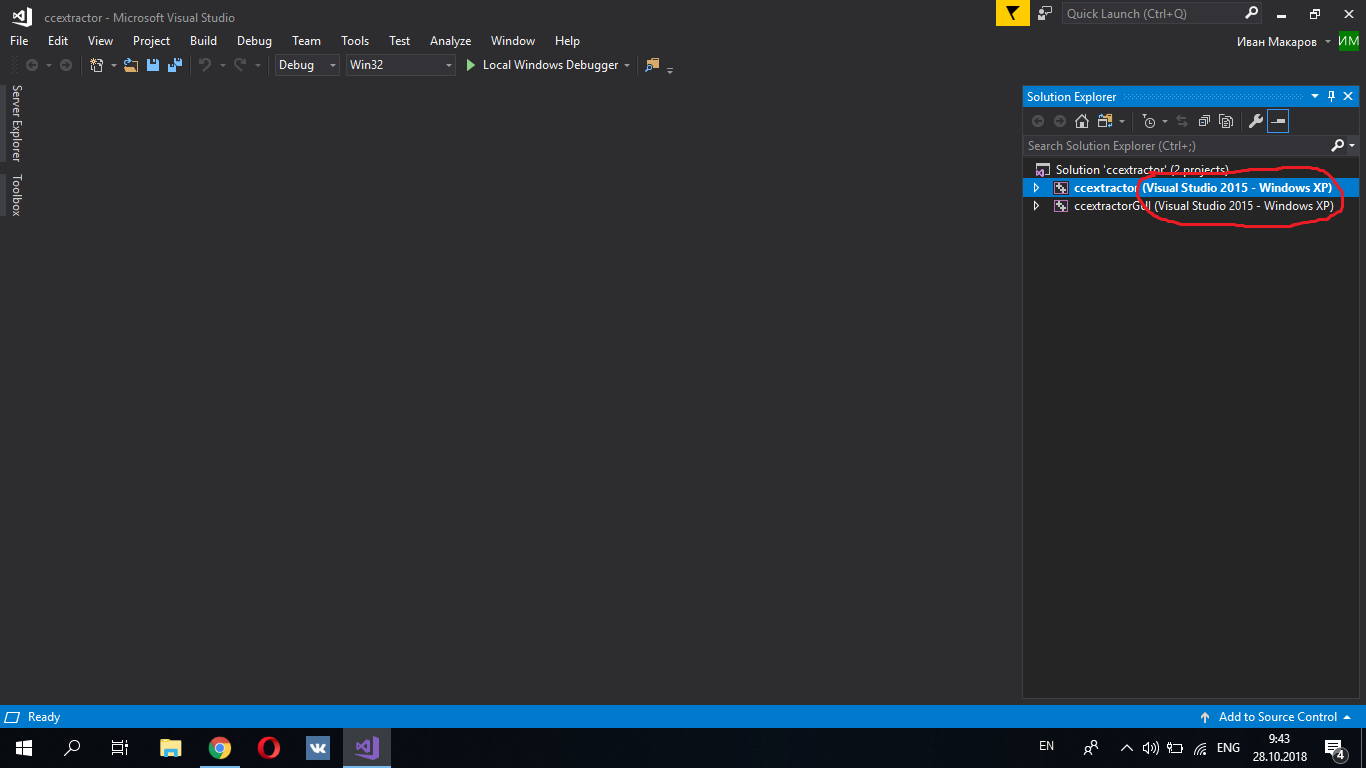
4.In Solution Explorer, you'll see two projects with the VS version and Windows release version in parenthesis. Change them to parameters which are true for you by clicking right mouse button on project and selecting properties.
5.Right click and select build to compile the project and generate executable file.
6.Find the executable file in Debug or Release folder, based on selected configuration.
Configurations options are: (Debug|Release)-Full
Configurations options include dependent libraries which are used for OCR.
Using CMake
You may also generate .sln files for Visual Studio and build using build tools, or open .sln files using Visual Studio.
cmake ../src/ -G "Visual Studio 14 2015"
cmake --build . --config Release --ccextractor
Using MSBuild
Run the following command in windows/ directory
msbuild ccextractor.sln /p:Configuration=Release /p:Platform=x64
Different configuration options are,
| Configuration | Platform | Rust target required |
|---|---|---|
| Release | x64 | default |
| Debug | x64 | default |
| Release-Full(OCR) | Win32 | i686-pc-windows-msvc |
| Debug-Full(OCR) | Win32 | i686-pc-windows-msvc |
Building Installation Packages
Arch Linux
Go to the package_creators folder using cd and run the ./arch.sh
Redhat Package Manager (rpm) based Linux Distributions
Go to the package_creators folder using cd and run the ./rpm.sh


